Showing posts with label Recipes. Show all posts

Wednesday, June 25, 2014

Lemon, Poppy and Chèvre Cheesecakes

There is something relaxing and therapeutic about spending a weekend afternoon testing out a new recipe that takes hours and stages to prepare. This is exactly what I did a couple of Saturdays ago after quite a few weeks of weekend travel. My experiment this time was cheesecake, which was something that had previously seemed to be too intimidating to attempt. However, after perusing through Food & Wine, Southern Living, Cooking Light, and a few other magazines, I felt inspired, and set out on my quest to create a lemon, poppy, and chevre cheesecake with steusel and a raspberry and strawberry compote. As most recipes I make, I found a great recipe that incorporated seasonal items and tweaked it to fit my tastes, be slightly healthier, and become a my creation. I also loved that this recipe makes individual portions in ramekins (everything is cuter in mini sizes!), which was perfect for just the two of us, and would make a great treat to take to a small dinner party.

Lemon, Poppy and Chevre Cheesecakes with Raspberry and Strawberry Compote


Recipe adapted from Food and Wine


Yield: 8 mini cheesecakes (cooked in 8 ounce ramekins)

Nutrition for cheesecake only: 221 calories, 16.7 grams of fat; 6.5 grams of carbohydrates; 2.7 grams of sugar; 9.7 grams of protein

Ingredients:
Cheesecakes:

  • 1/4 cup, plus more for coating the ramekins
  • 8 ounces fat free cream cheese, at room temperature
  • 6 ounces soft fresh goat cheese, at room temperature
  • 2 teaspoons finely grated lemon zest
  • 1 teaspoon fresh lemon juice
  • 1/2 teaspoon vanilla bean paste  
  • 1 teaspoon pure vanilla extract
  • 1/4 teaspoon salt
  • 1 cup fat free sour cream
  • 3 large eggs, at room temperature
  • 1 tablespoon poppy seeds
Strawberry & Raspberry Compote
  • 8 ounces strawberries
  • 1/2 cup sugar
  • 1/2 vanilla bean, split
  • Pinch of salt
  • 1 teaspoon finely grated orange zest
  • 1 tablespoon St.-Germain liqueur 
  • 1 pint raspberries
  • Juice from half of a lemon
  • Juice from half of an orange
Streusel
  • 5 tablespoons unsalted butter, at room temperature
  • 1/4 cup plus 2 tablespoons sugar
  • 1/2 teaspoon fresh lemon juice
  • 1 cup graham cracker crumbs (from 1 sleeve)
  • 1 teaspoon all-purpose flour
  • 1/2 teaspoon salt
  • 1/4 teaspoon cinnamon
I. Make the cheesecakes: 
  • Preheat the oven to 325°. 
  • Spray eight 4- to 6-ounce ramekins with vegetable oil spray and dust with sugar; tap out the excess. Set the ramekins in a large roasting pan. 
  • In a large bowl, using an electric mixer, beat the cream cheese, goat cheese and the 1/4 cup of sugar until smooth. 
  • Split the vanilla bean in half and slice to remove the beans. 
  • Beat in the zest, lemon juice, vanilla beans and pure vanilla extract, and salt. I doubled up on the vanilla here, because I like a strong vanilla taste in cheesecake. 
  • Beat in the sour cream. 
  • Add the eggs, one at a time, beating well between additions. 
  • Beat in the poppy seeds.
  • Divide the mixture between the ramekins and set the pan in the oven. Carefully add enough hot water to the pan to reach halfway up the sides of the ramekins. 
  • Bake for 20 to 25 minutes, until the cheesecakes are just set. 
  • Remove from the oven and let cool in the water bath for 1 hour. Refrigerate the cheesecakes until cooled completely, 3 hours.


II. While the cheesecakes are cooking, make the compote: 

  • Cut your strawberries into fourths and slice down one side of your vanilla bean.
  • In a medium sauce pan, add your strawberries, raspberries, sugar, orange zest, orange juice, lemon juice, St. Germain, vanilla bean, and salt. 
  • Cook over moderate heat, stirring frequently, until the berries are breaking down and the excess juice cooks off, and the liquid is slightly thickened (to a syrup like consistence). 
  • Transfer the compote to a bowl and let cool. Discard the vanilla bean.


III. Make the streusel:
  • Preheat the oven to 350°. 
  • Line a baking sheet with parchment paper. 
  • In a bowl, using an electric mixer, beat the butter, sugar and lemon juice until fluffy. 
  • Beat in the graham cracker crumbs, flour, salt and cinnamon. 
  • Pat the streusel flat onto the baking sheet and freeze for 10 minutes.
  • Bake the streusel for about 20 minutes, until fragrant, golden and firm.
  • Let cool completely, then crumble the streusel.
IV. Get ready to eat! 
  • Place the streusel crumbs on the plate (put enough to cover the size of the bottom of your ramekins). 
  • Run a thin knife around the cheesecakes and invert them onto plates. 
  • Spoon the compote on top, and serve right away!


Since I substituted some fat free ingredients making the cheesecake come in at only 221 calories, I didn't feel quite as bad indulging in second one the next night. 

Hope you enjoy these light, fluffy, refreshingly lemony cheesecakes at your next summer dinner!


xoxo 
*K
(all photos by me)


Tuesday, March 18, 2014

Fat Free Ricotta Gnocchi with Mushroom Ragu

Making gnocchi had been on my list for ages to make. I've pinned and saved many gnocchi recipes and for some reason or another (normally my craving for meat or desire to quickly cook dinner), put it off. A few weeks ago, Jason and I had an amazing lunch at Lupa with our dear friend Jo who was back in New York from Toronto. Jo highly recommended Lupa, and it is one of the best Italian meals I've ever had, and tied with Casa Mono for the best of the Batali restaurants (even over Babbo and Del Posto). Italian is normally pretty far down my list of cuisines, but Lupa totally changed my mind on that, by having robustly flavored dishes that were still light and nicely portioned, not at all like the traditionally thought of heavy cream, large Italian dishes; therefore, we completely indulged in the menu and had several courses for lunch. (Another positive side note on Lupa: they easily accommodate gluten free and dairy free diets, just another reason to go there.) One of Jason's dishes was a ricotta gnocchi with sausage and fennel, and the inspiration for my newest experiment. 

I had seen a recipe for ricotta gnocchi on A Cup of Jo and thought I could make it using fat free ricotta, cutting down the fat and calories in the dish, and finally got around to trying it. Making gnocchi does take a bit of time because of the shaping process, but it is not nearly as time consuming as I had pictured (ie: this little cute old Italian grandmother hand-making gnocchi over the course of an entire day, which becomes the centerpiece of the delicious meal she prepared for 30 of her closest relatives...I digress). In fact it only took about 20-30 minutes to mix, shape, and roll the gnocchi, and another 5-6 minutes to boil them and finally a couple of minutes to brown them, and the process is one of those therapeutic cooking experiences where I get lost in the process of making the dish and the peace of being in the kitchen without anything else on my mind but the end result of my work to be enjoyed with a French Chardonnay.


Fat Free Ricotta Gnocchi
Recipe slightly adapted from A Cup of Jo
Yield: 6 servings (11 pieces)
Nutrition: 201 calories; fat: 7.8g; sodium: 302mg; carbs: 20.1g; protein: 12.3g

Ingredients:
  • 1 large egg
  • 1 large egg yolk
  • 15 ounces fat free ricotta (about 2 cups)
  • ½ teaspoon freshly ground black pepper
  • ½ cup finely grated Pecorino-Romano (plus more for serving) (The original recipe called for Parmesan. You can use whichever you prefer/have on hand.)
  • ½ teaspoon kosher salt
  • 1 cup all-purpose flour
  • Olive oil
  • Kosher salt
  • Fresh basil (optional)

Directions:
1. In a large bowl, whisk egg and egg yolk. Add ricotta, pepper, Parmesan cheese and kosher salt, and mix until well combined. Add flour; stir just until combined and mixture forms a ball. Add more flour as necessary if the dough is too wet.


2. Dust a rimmed baking sheet generously with flour. Measure out 1/2 tablespoon of dough, and roll into balls; they don't have to be pretty (I used the 1/2 tablespoon to ensure my gnocchi were uniform in size and would cook evenly. You should end up with about 63-66 gnocchi). Then roll the gnocchi with more flour so that they are coated.


3. Cook gnocchi in a large pot of boiling salted water, stirring occasionally, until cooked through and tender, 5-6 minutes. The gnocchi will quickly float to surface, but continue cooking for the entire 5 to 6 minutes until they are fully cooked. (Save this step until your sauce is prepared, so they don't get cold while the sauce cooks.)


4. Remove the gnocchi with a slotted spoon and transfer to a plate. In a non-stick skillet, heat a few drizzles olive oil with some minced garlic, then add the gnocchi and gently pan fry for a few minutes on each side, until lightly browned. Add your sauce and serve with basil chiffonade.


Mushroom Ragu
Yield: 6 Servings
Nutrition: 213 calories; fat: 12.4g; sodium: 111mg; carbs: 16.3g
Recipe adapted from Food & Wine

Ingredients
  • 2 tablespoons unsalted butter
  • 1/4 cup extra-virgin olive oil
  • 8 ounces baby bella mushrooms
  • 4 ounces oyster mushrooms
  • 4 ounces maitake mushrooms
  • 4 ounces shiitake mushrooms
  • 2 shallots, minced
  • 2 garlic cloves, minced
  • 1 teaspoon finely chopped thyme
  • 1/2 cup dry white wine
  • 1/4 cup fat free chicken stock
  • 1/4 cup green onions
  1. Directions: 
  2. 1. Roughly chop all mushrooms; mince shallots and garlic, and chop the thyme and green onions

  1. 2. In a French oven, melt the butter in the oil. Add the mushrooms, garlic, thyme, and shallots, and season with salt and pepper. Cook over medium high heat, stirring, until tender and just browned. Stir in the wine and cook until nearly evaporated. Add the chicken stock and green onions, and cook until the liquid is about 2/3 evaporate; keep warm over low heat.
This fat-free ricotta gnocchi can be made mostly ahead of time and refrigerated for up to two days (leaving only the boiling and browning). I loved the balance of the delicate flavors of the gnocchi contrasted with the strong flavors of the mushroom ragu, which really took the spotlight, and the whole dish was under 500 calories per serving! However, for those of you that don't like mushrooms (blows my mind that is possible), this gnocchi is so versatile it could stand up to tomato-based sauces or something creamy. Give this recipe a whirl when you have some time and feel like playing with your food while you make it. 

xoxo
*K
(all photos by me!)


Tuesday, March 4, 2014

Baked Eggs

I just finished taking the North Carolina Bar Exam last week, which meant that for the past two months I spent almost every free moment outside of work studying. I also started wearing the Fitbit Force* in mid-December, and really focusing on health, working out 5-6 days a week, and monitoring my intake (ie trying to lose 10+ pounds). So, needless to say, I have not had time for anything fun. The weekend before the bar exam, I decided to fit in a quick and easy new experimental recipe. For the past year or so I've seen many recipes for baked eggs on Pinterest, and have had it on my list of things to try to make at home, and finally created my own version of it using the random items we had in our otherwise bare cabinets.

Pancetta, Onion, and Mushroom Baked Eggs


Yield: 4 Servings
Nutrition: Calories: 223  Fat: 9.6g ; Sodium: 466mg; Carbs: 20.6g; Protein: 17.3g

Ingredients: 


  • 1/2 large yellow onion
  • 1 ounce pancetta
  • 4 ounces baby bella mushrooms
  • 12 cherry tomatoes
  • 2 ounces Cabot 75% fat free cheddar
  • 1 teaspoon minced garlic
  • 4 eggs
  • 4 tablespoons tomato sauce (I cheated here: I would normally make my own sauce, but since I was pressed for time, I used Classico Tomato and Basil Sauce, and I'm not sure that it makes a big difference to use pre-made sauce with a dish like this, given the small quantity used.)
  • salt and peper, to taste

Directions:
1. Roughly dice tomatoes, mushrooms, onion, and pancetta.


2. Saute onion, pancetta and garlic until the onions are translucent and the pancetta is lightly browned (about 3-5 minutes) over medium-high heat. Add in the mushrooms and half of the tomatoes for the last minute.


3. Start the layering process by placing 2 tablespoons of tomato sauce into each ramekin. (You could cook this in one large baking dish, but I really liked the individual 7 ounce Le Creuset ramekins for this. It made the perfect individual serving and really allowed the flavors to meld without losing any one ingredient, or having the eggs cook together).


4. Next, spoon the pancetta/onion/tomato/mushroom mixture on top of the sauce.


5. Add the diced cheese: 1/2 ounce into each dish.

Sorry for the blurry iPhone pictures
6. Final step of the layering: crack your egg and gently pour in on top of the cheese. (As you can see below, some stayed in the middle, and others fell more to the side. Due to my OCD/symmetry loving-tendencies, I would prefer for all of them to be in the middle, which you could do by piling the cheese and leaving a perfect little dip for the egg, but it honestly does not make a difference to the way it cooks up or the taste.)


7. Gently place two tomato halves on top/side of each egg, and then bake for 6-8 minutes, until the egg white is almost cooked. You'll know it is ready when the juices from the tomato sauce and pancetta/veggie mixture start to bubble to the top. 


Serve with breakfast potatoes or toast and enjoy the results of your 15 minutes recipe!

xoxo 
*K

(all photos by me..explains the blurry, hastily taken iPhone quality...also completely illustrates my past two months)

*Side Note: the Fitbit Force has been an awesome tool to help me monitor my food intake, encourage me to exercise, and see the results of my efforts. I officially hit the down 10 pounds-mark after eating this brunch creation. However, I am sadly one of the 1.7% of people who have had an allergic reaction to it (I think to the nickel), but fixed that by covering the metal parts with electrical tape. I fully endorse Fitbit's products and their app, especially for those of you who like me, have that bit of weight you put on gradually and didn't really notice, or are at the point of trying to lose those last few pounds and need some help. I think I have always been a pretty active and health-conscious person, but this has helped me take it to the next level, and has made it more fun and like a game with the step/active minute/stair/calorie achievements daily. (And, no, I am not receiving anything from Fitbit, nor am I any kind of spokesperson for them. I really like their products and the results I have seen in two months time--10 pounds is a huge achievement for someone my size (8% of my weight)!)


Thursday, January 2, 2014

Sticking with the Classics: Steak Au Poivre

It's the start of a new year, and the time when many people make resolutions to make changes, great or small, and depart from their past. I think I've only once made a resolution for New Years (to give up fries, which I did for almost 18 months), but otherwise, I am not one to think I have to change something every January 1st. I am extremely analytical and often make "resolutions" throughout the year changing the way I approach challenges, my perspective on life, and my eating/exercising habits. I've come to realize the more extreme or nonnative changes I try to make most often don't work, and I am better off staying true to myself and sticking to the classics. I think this mantra is also very true to food, and as much as I like experimenting with cooking techniques and trying new foods, some things will never disappoint. Steak au Poivre is one of those classic dishes; whether made at home or ordered at a restaurant, it never disappoints. For those of you who are endeavoring (as I constantly am) to eat healthier, this recipe from Cooking Light will allow you to have a classic without wrecking your resolution (read: diet).


Balsamic Steak Au Poivre

Recipe slightly adapted from Cooking Light
Yield:  3 servings (3.5 ounces of steak)
Nutrition: 245 calories; 13 grams of fat; 5 grams of saturated fat; 25 grams of protein

Ingredients: 
  • 1 10 ounce dry aged porterhouse steak (if it is bone-in, you'll need to get one that is about 1.25 pounds because the fat and bone will count for a large portion of the weight--I found this to be fact by using my new kitchen scale, which I will say is a must have for anyone who cooks or fancies herself/himself a chef)
  • 1/2 teaspoon of kosher salt
  • 2 tablespoons mixed peppercorns
  • 1 tablespoon of olive oil
  • 1/3 cup of finely chopped shallots
  • 1/2 cup of fat free, lower sodium beef broth
  • 2 tablespoons of balsamic vinegar
  • 1 tablespoon of unsalted butter
  • 2 tablespoons of low sodium soy sauce
Directions:
1. Coarsely crush the peppercorns, leaving some whole (I placed them in a ziplock bag, and crushed them using the butt of my chef's knife). Then pour the soy sauce and salt over your steak, and press the peppercorns into both sides of the steak. Let it rest for 15-30 minutes.

What a beauty.
2. Heat olive oil in skillet over medium-high heat. Cook steak, flipping only once so as to preserve the peppercorns in the steak. 

3. While the steak is cooking, dice shallots. 


4. When steak is done cooking, keep it warm while you cook the sauce. Add shallots to pan and saute for about a minute, until tender. There should be residue and peppercorns in the pan.


5. Add balsamic vinegar and beef stock and bring to a boil and scrape off browned bits from pan (they will mix into the liquids easily. 


6. Cook for 2 minutes, stirring constantly, until reduced by half. Then remove from heat and add in butter (it is easier to stir in if you chop the butter into small pieces).

7. Cut steak into 1/2 inch strips and serve with sauce. ( You could do a more traditional square cut of meat, but I liked letting the sauce soak into each strip for a minute while I assembled my salad).


I served mine with a Caesar salad (using Walden Farms dressing) and had a fabulous dinner, cooked in less than 20 minutes, and for less than 500 calories!


Cheers to the classics and 2014!
xoxo
*K

Thursday, December 5, 2013

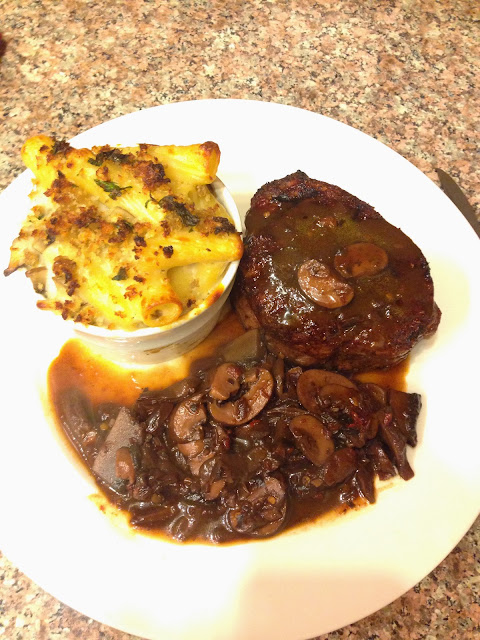
Red Chile Crusted Filet Mignon with Ancho Chile Mushroom Sauce and Mac n 'Shrooms


In case you haven't already detected a theme, which points to my two favorite foods that I will almost invariably choose off of any menu or make for myself on a weekly basis: steak and mac and cheese. Steaks are the sole reason I could not ever be a vegetarian. Starting before I could really speak in full sentences, my mother introduced me to steak, and at that point it was the start of a lifelong love affair. From the thought of chimichurri hangar steaks to perfectly grilled bone-in rib-eyes to dry-aged prime filet mignon, my mouth waters and then the overwhelming craving commences. There is no option but to set on a quest for that perfect steak and satisfy the craving. 

On the other hand, there is my love of mac and cheese: the food on which I almost solely subsisted as a child. As I got older and my tastes became more refined, I realized the endless creations that take the name "mac and cheese", substituting the packet of powdered cheese from that beloved blue box for a wide range of cheeses and including other ingredients such as bacon, truffles, onions, peas, mushrooms....

My cravings for both of these adored foods often come about on the weekend, when I crave comfort and have the time to properly devote to such wonderful foods. Now in the colder months, this spicy steak and creamy mac and cheese are perfect to add spice and comfort to the season.


Red Chile Crusted Filet Mignon with Ancho Chile 

Mushroom Sauce


Recipe Courtesy of Bobby Flay

Ancho Chile Mushroom Sauce:

Ingredients: 

  • 2 tablespoons olive oil
  • 1/2 medium red onion, finely diced
  • 1 tablespoon finely chopped garlic
  • 2 cups red wine
  • 1/2 pound shiitake mushrooms, stems removed and caps sliced 1/4-inch thick
  • 1/2 pound crimini mushrooms, stems removed and caps sliced 1/4-inch thick
  • 1/2 pound portobello mushrooms, stems removed and caps slice 1/4-inch thick
  • 3 cups chicken stock
  • 1/2 cup ancho puree
  • 2 tablespoons chipotle puree
  • 2 tablespoons honey
  • Salt and freshly ground pepper

Directions:

1. Cut all ingredients
Home grown chiles!


2. Heat the oil in a large saucepan over medium high heat. Add the onion and garlic and cook for 3 minutes. 

3. Raise the heat to high. Add the wine and cook until dry (and drink a glass while this cooks off). 


4. Reduce the heat to medium, Add the mushrooms and cook until lightly browned and soft, and then add the stock. Raise the heat to high and bring the mixture to a boil. Reduce the heat to medium and simmer for 15 minutes.

5. Whisk in the ancho puree and chipotle and cook for 5 minutes more. Add the honey and salt and pepper to taste. Keep warm until steaks are done.

Red Chile Crusted Steak:

Ingredients: 

  • 2 tablespoons New Mexico red chile powder
  • 1/4 teaspoon chile de arbol powder
  • 1/2 teaspoon pasilla chile powder
  • 1 tablespoon cracked black peppercorns
  • 1 tablespoon brown sugar
  • Kosher salt
  • 4 filet mignons, 1- to 1 1/2-inches thick (I actually think this recipe is better suited to use ribeyes or porterhouse steaks because the spice and flavor of the sauce overwhelms a filet, and the filet has such good flavor on its own.)

1. Combine all the ingredients together in a medium bowl, and dredge each steak on 1 side in the pepper mixture.  (You can do all of this prior to creating your sauce and let the steaks sit in the pepper crust while preparing the sauce.)


2. Brush a large saute pan or grill pan with oil and heat over high heat until almost smoking. 

3.  Cook for 1 minute on each side, until brown and crisp. Turn the meat over, reduce the heat to medium, and cook for 3 to 4 minutes more, until done to your liking.

4. Serve with the Ancho Chile Mushroom Sauce.

Please note: this is a spicy dish. I often put items up with spice, but this one is not for the tender taste-buds who find medium buffalo wings hot. 


Mac n 'Shrooms

Recipe adapted from Food Network

Ingredients:

  • Kosher salt
  • 1 pound mezzi rigatoni (I've also done this with large shells and it's awesome because the cheese sauce really pools in the shells)
  • 1 stick unsalted butter
  • 1/2 cup all-purpose flour
  • 4 cups skim milk
  • 1/4 teaspoon freshly grated nutmeg
  • 1/2 teaspoon of ground white pepper
  • Freshly ground pepper
  • 2 tablespoons extra-virgin olive oil
  • 1 pound wild mushrooms, such as oyster or shiitake, stemmed and sliced
  • 4 ounces cremini mushrooms,
  • quartered
  • 5 ounces of brie, rind removed, cubed 
  • 5 ounces of Camembert, cubed
  • 4 ounces pecorino cheese, grated 
  • 1/2 cup breadcrumbs
  • 2 tablespoons chopped fresh parsley


Directions:

1. Bring a large pot of salted water to a boil; add the pasta and cook until al dente, about 9 minutes. Drain the pasta, reserving about 1/4 cup cooking water.

2. Chop and prepare all cheese and mushrooms.


3. Melt 4 tablespoons butter in a large skillet over medium heat. Stir in the flour with a wooden spoon to make a paste. Cook, stirring, until the paste puffs slightly, about 1 minute. 


4. Remove from the heat and gradually whisk in the milk until smooth. Bring to a boil over medium-high heat, whisking. Reduce the heat and simmer, whisking occasionally, until the sauce is creamy, 8 to 10 minutes. Add the nutmeg and ground white pepper and season with salt and pepper.

5. Heat 2 tablespoons butter and the olive oil in a large skillet over medium-high heat. Add half of the mushrooms and cook until soft, about 8 minutes. Season with salt. Push to the side of the pan and repeat with the remaining mushrooms.


6. Reduce the heat under the sauce to low and whisk in both cheeses until smooth. Stir in the mushrooms and pasta and toss, adding the reserved cooking water as needed (because I use different cheeses than the original recipe, and in a slightly greater quantity, I've never had to add any pasta water).


7. Melt the remaining 2 tablespoons butter in a skillet over medium heat. Add the breadcrumbs and toast until golden; then stir in the parsley. Divide the pasta among 8 small bowls. Garnish with the breadcrumb mixture. (I have also made a double batch of this for a holiday dinner and did it in a big pot and baked it in a large baking dish and it turned out just as well.)


This is a perfect, warming meal to make on a dreary weekend, when it's too cold to even walk three steps out of the door to hail a cab to go to dinner!

xoxo!
*K


Tuesday, November 26, 2013

Caramelized Onion, Gruyere and Bacon Spread (Cooking Light Approved!)

I found this recipe for caramelized onion, gruyere and bacon spread on Cooking Light, and my mind was blown....a dip that has bacon and gruyere, and it's CL approved?!? 

I made this dip a few weekends ago when Mom was in town. We had an early brunch, and I was showing Mom how to sous vide a beef tenderloin, so dinner wouldn't be ready until late that evening. We were spending the afternoon watching the Giants game, which of course requires a snack. My god, this is the perfect spread: it is a decadent and filling, virtually guilt free, and it cooks up beautifully. It is an excellent dish to make and take to a party or holiday dinner, and pairs very nicely with wine. I don't think this dish needs much selling, so without further ado...

Caramelized Onion, Gruyere and Bacon Spread


Recipe slightly adapted from Cooking Light
Yield: 6 servings 
Nutrition: 103 calories; 4.1 grams of fat; 11.6 grams of carbohydrates; 6 grams of sugar; 4.5 grams of protein

Ingredients:
  • Cooking spray
  • 3 1/2 cups chopped sweet yellow onion
  • 2 ounces Gruyère cheese, shredded and divided
  • 2 tablespoons chopped fresh chives, divided
  • 1/3 cup fat free mayonnaise
  • 1/3 cup fat-free sour cream
  • 1/4 teaspoon salt
  • 1/4 teaspoon black pepper
  • 3 bacon slices, cooked and crumbled 
  • 1 tablespoon of brown sugar (this is my variation from the original recipe. I how the brown sugar adds crispiness and depth to onions when they're caramelized)
Directions: 

1. Preheat oven to 425°. 

2. Cook bacon in skillet. 

Who doesn't love the sight and smell of bacon cooking?!?
3. Chop/shred all ingredients.

Yes, the extra block of gruyere became the "snacking cheese"

4. Pour out all bacon grease; then add onion and 1 tablespoon of brown sugar to the pan that still has a light coat of the bacon grease. Sauté  for 5 minutes over high heat, stirring frequently. Reduce heat to low; cook 20 minutes or until golden brown, stirring occasionally. Cool slightly.

Aren't they pretty!


5. Reserve 2 tablespoons cheese and half of the chives. Combine remaining cheese, caramelized onion, 1 tablespoon chives, and the remaining ingredients in a medium bowl. 

6. Transfer the mixture to three 8oz ramekins (or a 1-quart glass or ceramic baking dish) coated lightly with cooking spray. Sprinkle with reserved 2 tablespoons cheese and chives. Bake at 425° for 20 minutes, until browned and bubbly. 

Serve with a freshly toasted french baguette and a chilled bottle of a dry South African Chenin blanc or a champagne cocktail with pomegranate or cranberries for a festive touch. And certainly don't feel guilty if you eat two servings (it is only a bit over 200 calories!).


xoxo 
*K